This is a quick intro how to get started with Secapp
Secapp is a critical communications and alerting SAAS platform built especially to cope with emergencies and disasters. It helps to broadcast mass notifications, alert individuals and teams, collect and share critical data in addition to providing a platform where data remains secure. In other words, Secapp allows organizations to
- Improve their preparedness for emergency conditions.
- Decrease their response times in dispatching individuals and teams.
- Coordinate large-scale operations efficiently even across organizational borders.
- Recover faster especially in times of crisis.
Note! This page is for quick deployment and key features of Secapp. You can find the complete user manual here.
Start using Secapp
This summary gives you a jump start to try Secapp in practice:
- Install Secapp app from App Store/Play Store and login with username and password.
- Alternatively , you can also use web client: login to Secapp at secapp.fi/nlogin with username and password
- Send an alert from the web application using ready-made alert templates.
- Receive the alert with the mobile app and respond to it. Chat with the users.
- Fill out the report with the mobile app. Notice that only part of the templates has a report attached.
- That was the short introduction to Secapp. More detailed info and walk-through about the key features in the next chapter.

1. User roles and credentials
Secapp platform is a closed system and user credentials are needed to be able to use it properly. Secapp user profiles can be divided into three different roles: basic user, dispatcher, and administrator. Each role has different rights on the platform:
- Basic users can receive and respond to alerts. They can participate in the conversations and fill out the reports.
- Dispatchers can send and track alerts and lead the situation + basic user functionality
- Administrator can manage (add, edit and delete) users, groups and alert templates + dispatcher functionality
User credentials can be used in multiple devices at same time so you can test it properly with group of people. Please don’t change the passwords of the users because other people are also using the same test users.
2. Installing a mobile application
Secapp’s main user interfaces are mobile applications and a browser. Please begin by installing the Secapp application on your mobile phone. Secap has an application for both major platforms (Android and iOS) and it can be downloaded free from the app store. Follow the installation instruction below and use the basic user credentials when asked.
3. Using Secapp with a browser
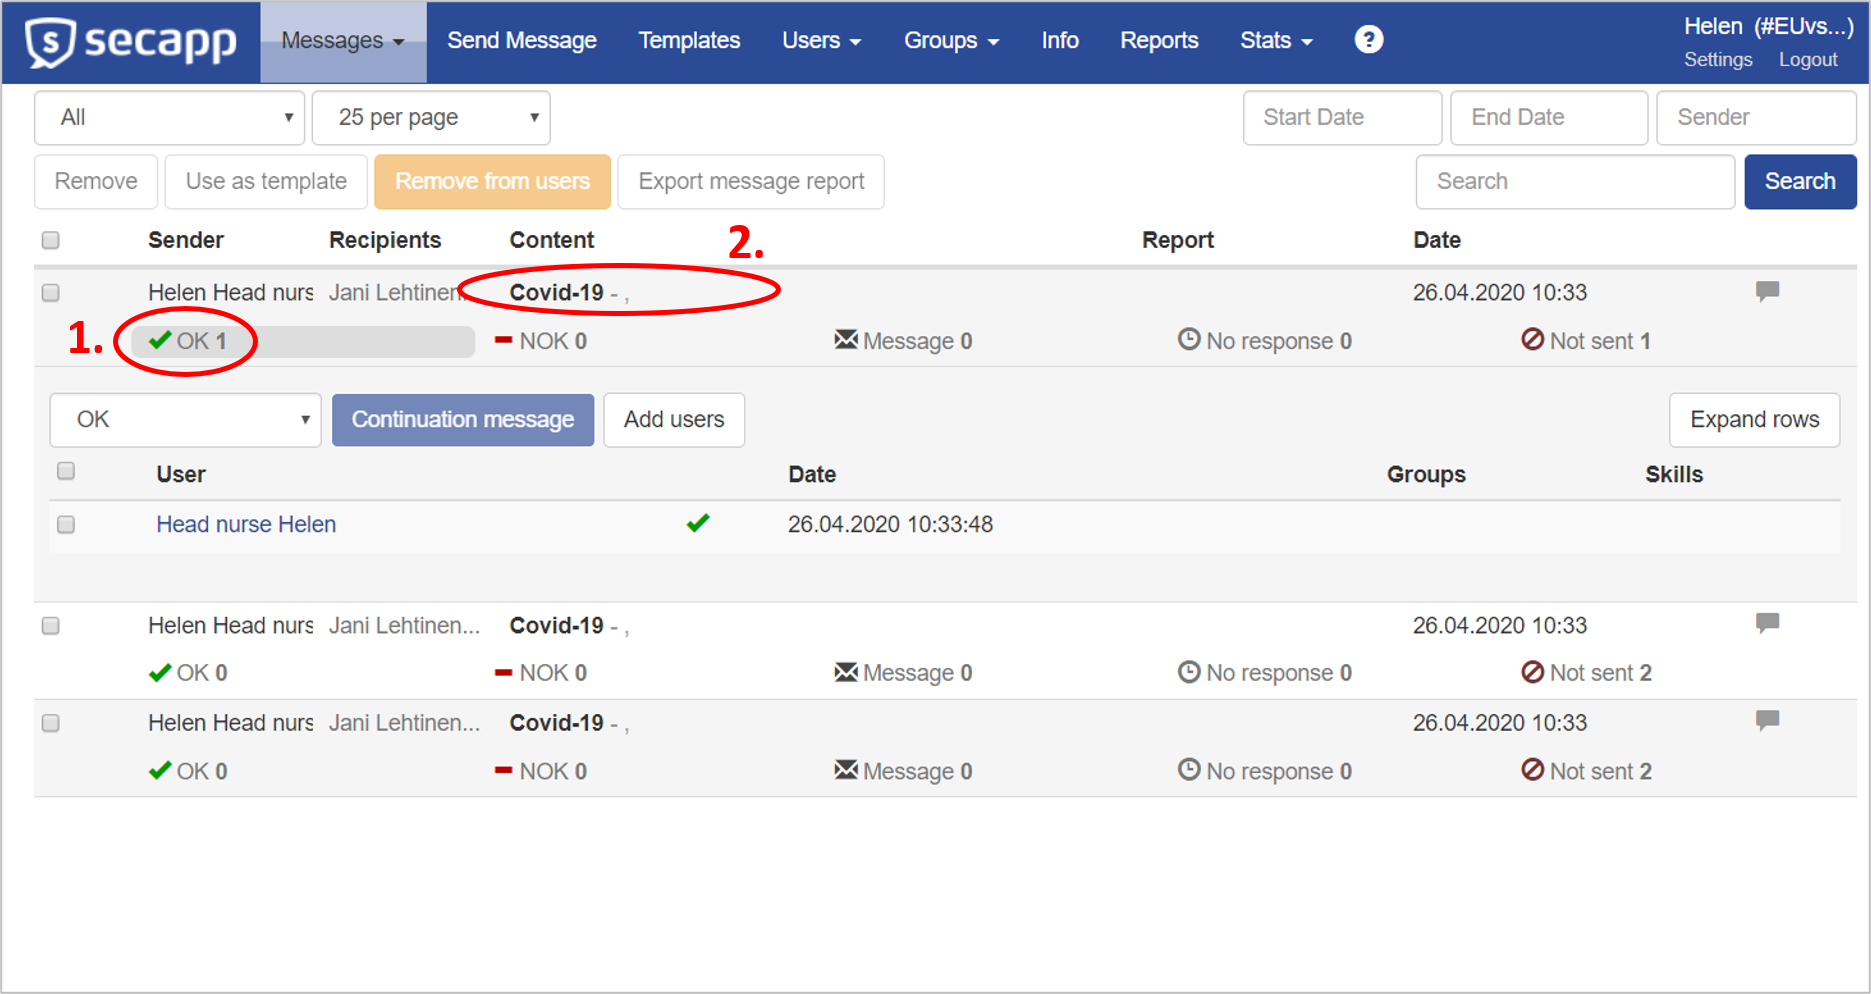
Go to www.secapp.fi and log in using the administrator user credentials. Secapp opens up with an Inbox view which is like email’s inbox, listing all alerts the user has sent and received.
- Each row in the listing represents an alert and clicking green check icon or other icons in the same row gives you a comprehensive view of how users have responded in the alert.
- Clicking the title of an alert opens a more detailed view of the alert.
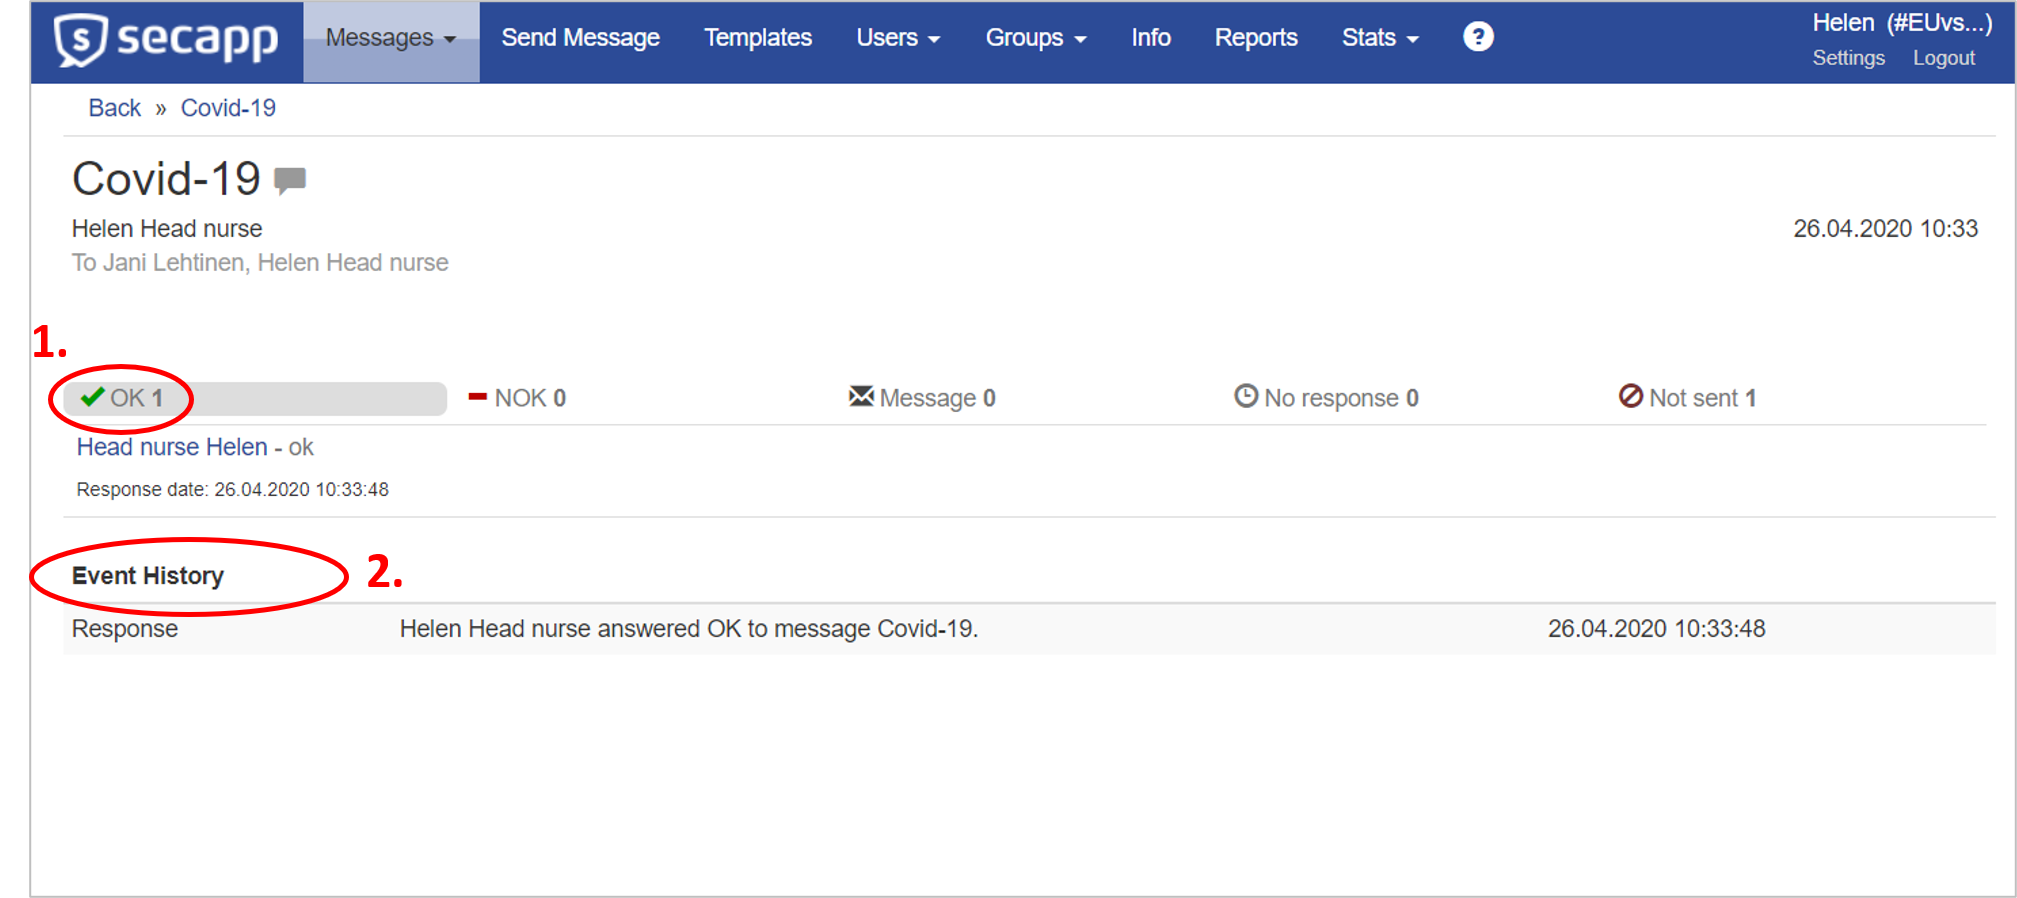
Alert’s details view shows the content of the alert message, responses form the users and a full history of the event regarding the alert.
- Clicking a green check icon or other icons in the same row gives you a comprehensive view of how users have responded in the alert.
- The event history of the alert lists all responses from the users and shows also if some user changes his response.
You can get back to the Inbox view by clicking the Secapp icon on the left corner.
3.1 Alert templates
Alert templates are the most powerful feature in Secapp. Alert templates can be customized for broadcasting messages and instructions that require immediate action from different stakeholders. For example, organizations can use alert templates for daily operations, or for complex public safety-related incidents, and disasters. These preparedness features include personnel and asset availability status, and location information when relevant.
1. Select Templates from top navigation and then select a template from the listing by clicking it. Main features of an alert template: 1. Priorities define how the alert is sent to the recipient’s phone. You can choose from 3 options:
- High = Full-screen alert with high volume ringtone and vibration. Bypasses phones mute setting if allowed.
- Medium = Full-screen alert and medium ringtone if the phone’s sound is on.
- Low = Notification when an alert arrives.
2. Alert can be sent to selected users, groups, or to a specific area. Select which option suits best for the use case at hand. Area option sends the alert to those users who are in the specified area or enter the area or leave the area.
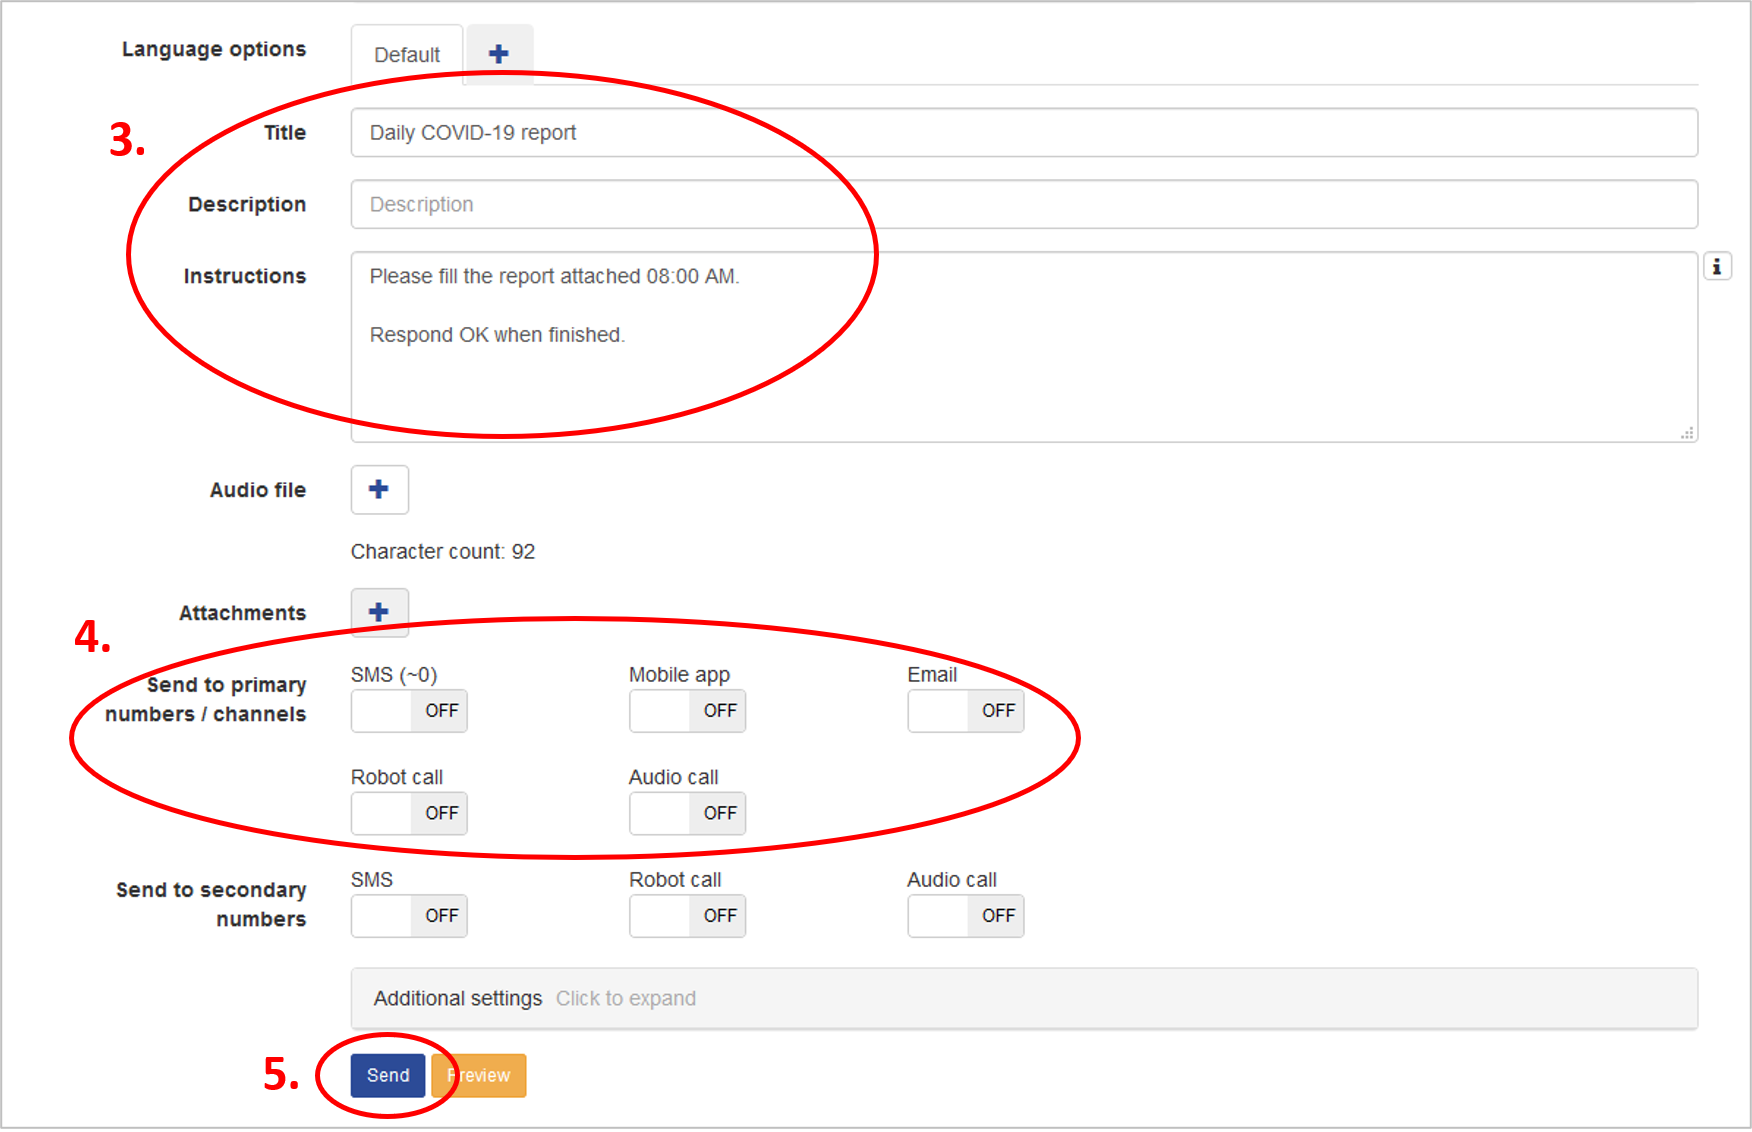
3. The title of the alert is shown with the largest and bolded letters in the mobile app. The title is also shown in every alert listings. Description complements the title on the alert.

4. Instructions contain the actual content of the alert. Typically instructions are procedures or other guidelines what to do when an alert arrives. It’s important to add a call-to-action line at the end of the instructions. How do you wish the recipients to respond for the alert? For example: “Please respond OK, if you can take part in the rescue team. Otherwise, please respond NOK.”
5. With “Send to primary numbers / channels” you can select the channels you want to sent the alert. If you select both SMS and Mobile app channels, the alert is sent only to a mobile app, if the user has a mobile application active. If the user does not have a mobile application at all or it’s not active, the message will be delivered as an SMS if the user’s phone number is listed in the user information. Users can have multiple phone numbers and you can also select to sent the alert also to the secondary numbers.
6. The alert template has many additional settings that change the behavior of the alert. For example, you can schedule the alert, filter the recipients by the skills they have, or add automation to the alert. With automation, the system sends continuation alerts based on the responses of the users. For example, automation can be set so that the first user who responds OK, get’s a new alert with content “You got the job” and all the rest users who responded later than the first one or haven’t yet responded, will get an alert with content “The shift is already filled”.
Both continuation alerts are sent automatically bases on the rule in the automation. This saves dozens of phones calls made and hours of work time that can be used with patients. There’s a ready-made template that has automation configured so you can try how staff call automation works.
3.2 Sending an alert with browser
1. Sending an alert start with clicking “Send Message” from the top navigation
2. After entering the “Send Message” view, you can either use an alert template or create an alert from the scratch. Using templates saves a lot of time and makes sending alerts very easy. Select a template from the drop-down list. The system fills all the fields based on the template. Usually, it’s good to check at least to whom the alert will be sent to be sure that there’s no wrong recipients selected.
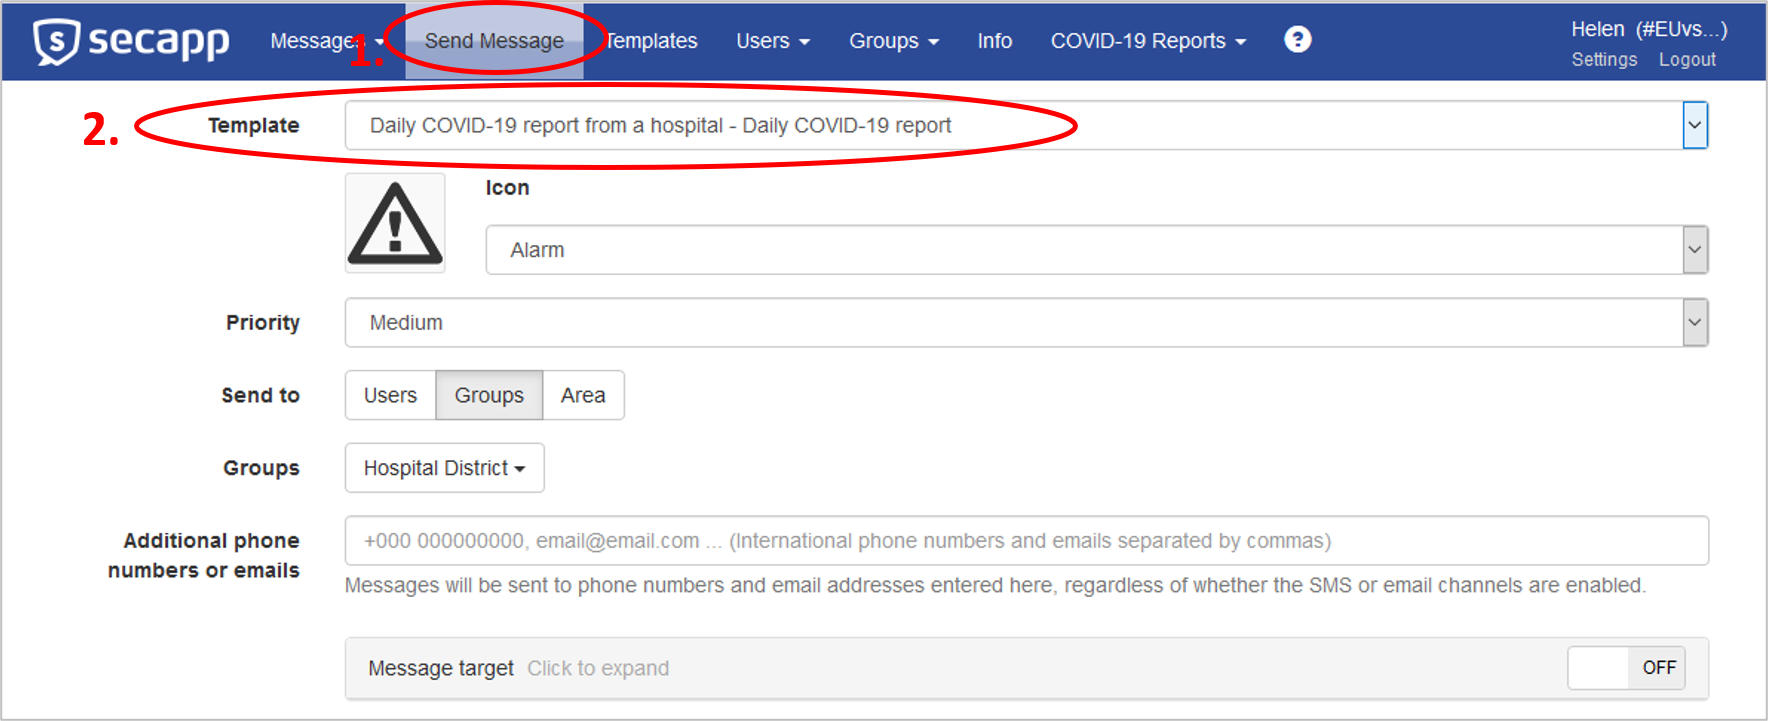
3. Make sure the actual content of the alert is valid. When using an alert template, there might be a date or some other changing part of the text in the content, check those before sending the alert
4. Check the channels which will be used to send the alert.
5. Send the alert by clicking “Send” button. After the alert is sent, there will be a link next to the Send button that will open the detailed view of the sent alert.

3.3 Conversations and filling in report with a browser
Secapp provides tools for handling real-time communication through secure chat and videos. Encrypted 1-on-1, group, and alert-specific Secapp chats allow real-time discussions as well as the content exchange between key personnel in both daily operations and critical situations.
- You can access the conversations from top navigation “Messages” and then select “Conversations”
- Type the message in the box and send it with right-hand side button. You can also add files to the conversation
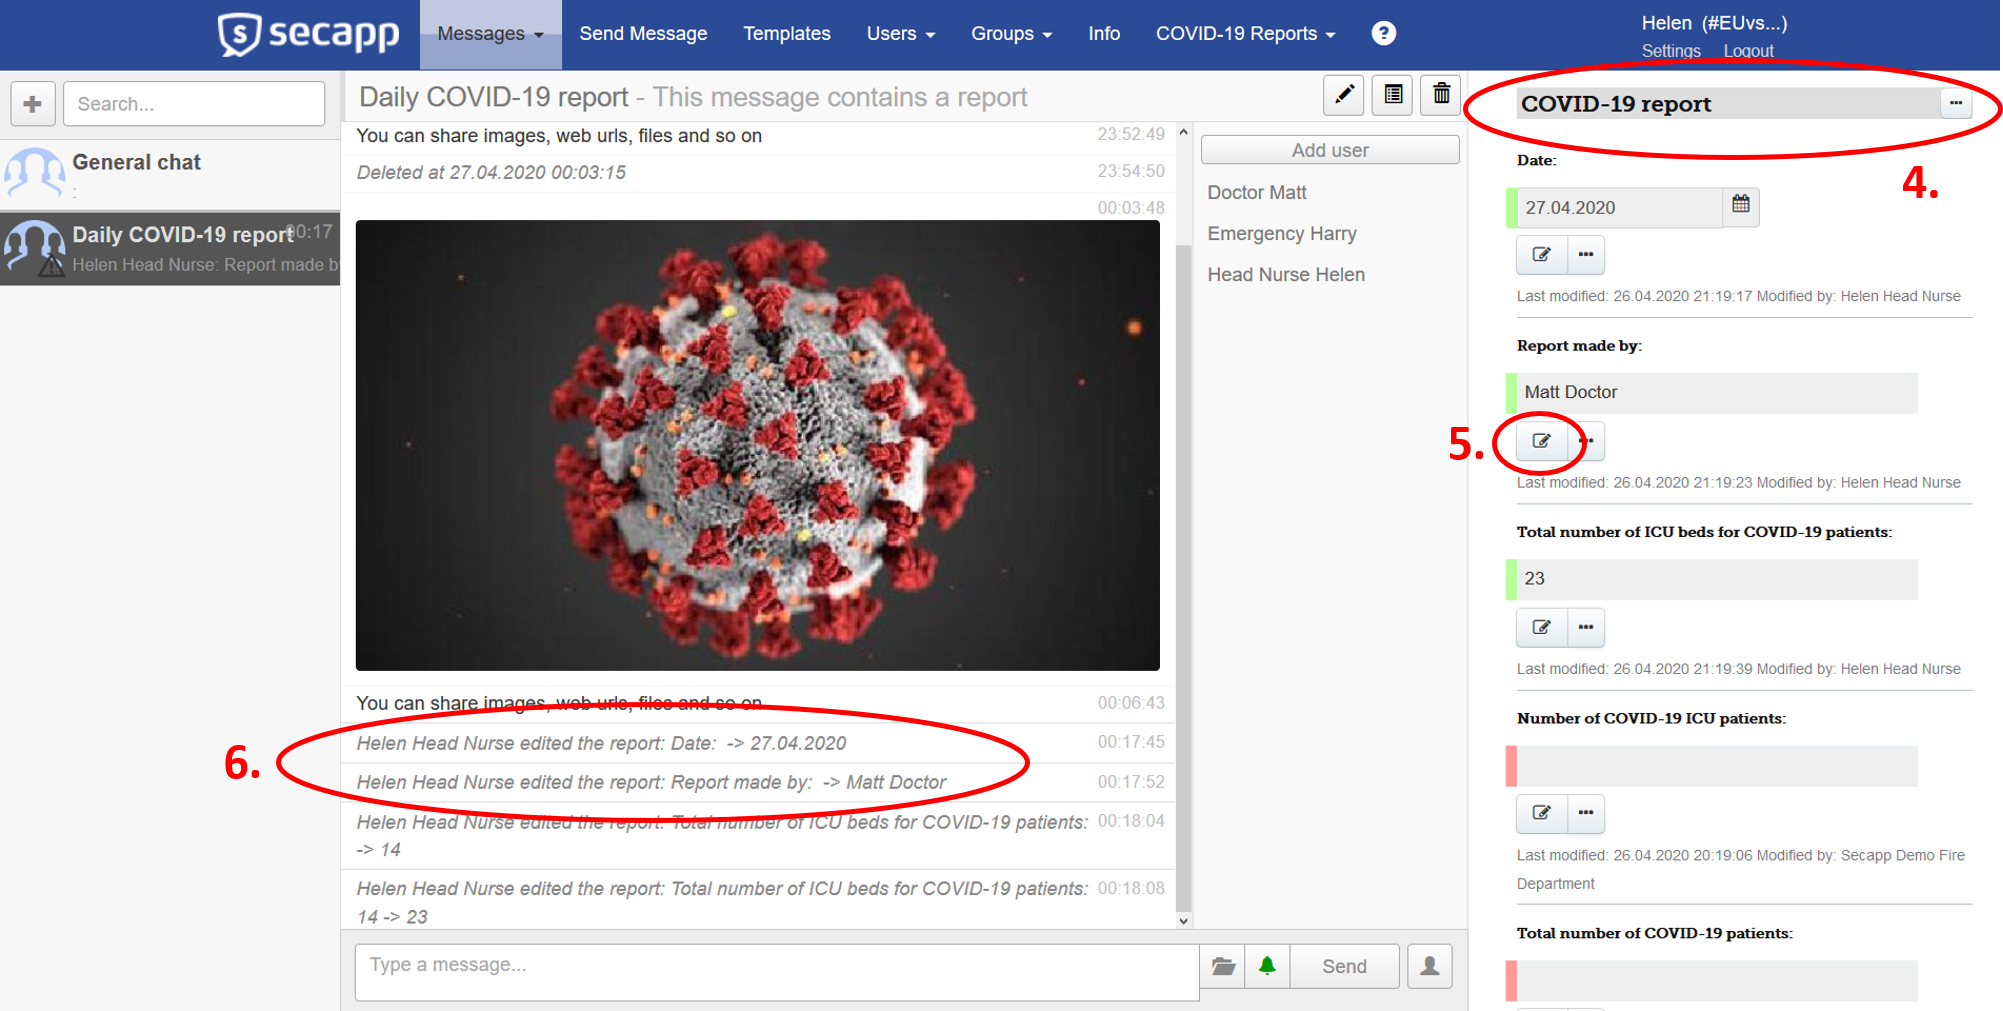
- Open report view by pressing a form icon in the upper right corner.
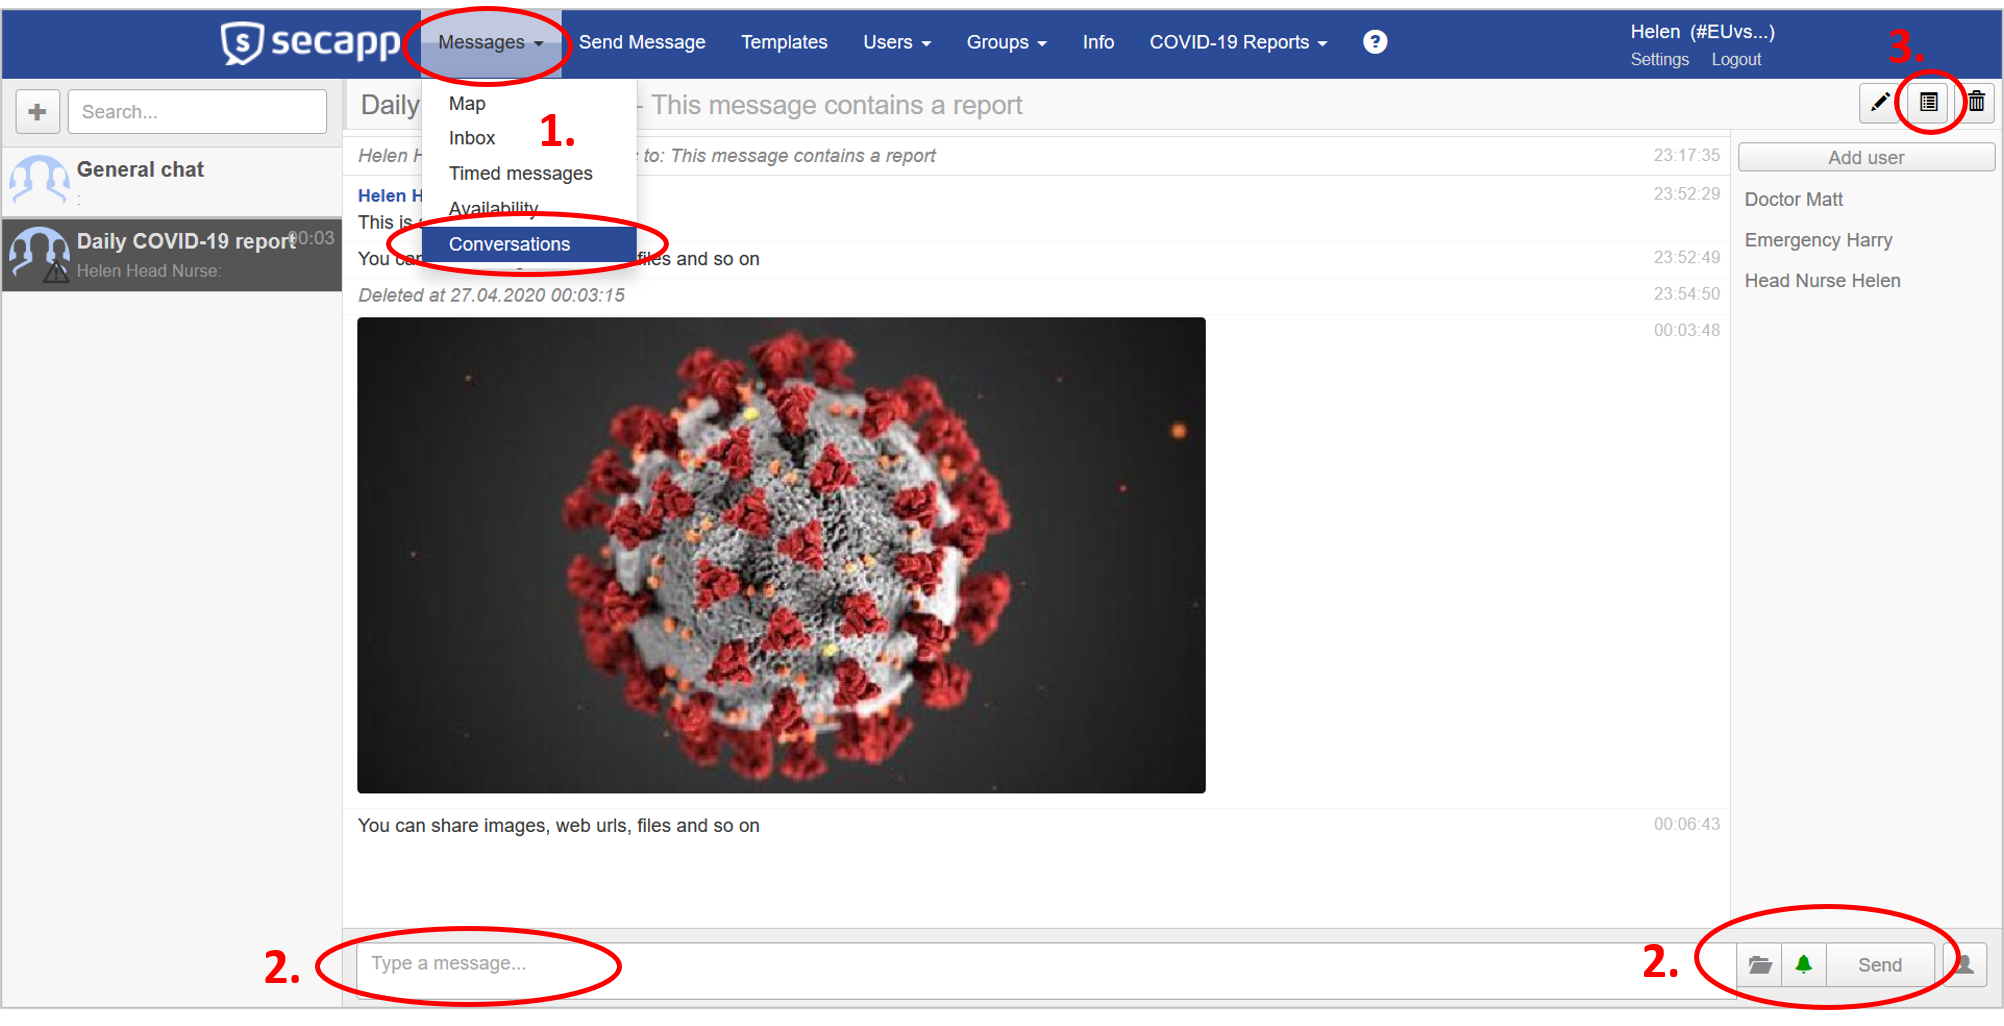
- The report opens up next to the chat window.
- You can insert values to the report by clicking the “Pen over paper” icon and then enter the value. Saving the data is made the same way.
- All changes to the report are also listed to the conversations so everyone who has got the original alert including this report, can follow how the situation evolves.
4. Using Secapp with a mobile application
Secapp has a mobile application for both major platforms Android and iOS. This chapter introduces mobile app features through Android. iOS app has the same features with that difference iOS navigation is bottom of the screen and the report looks little different than in Android. iOS screenshots from the main differences are listed at the end of the page.
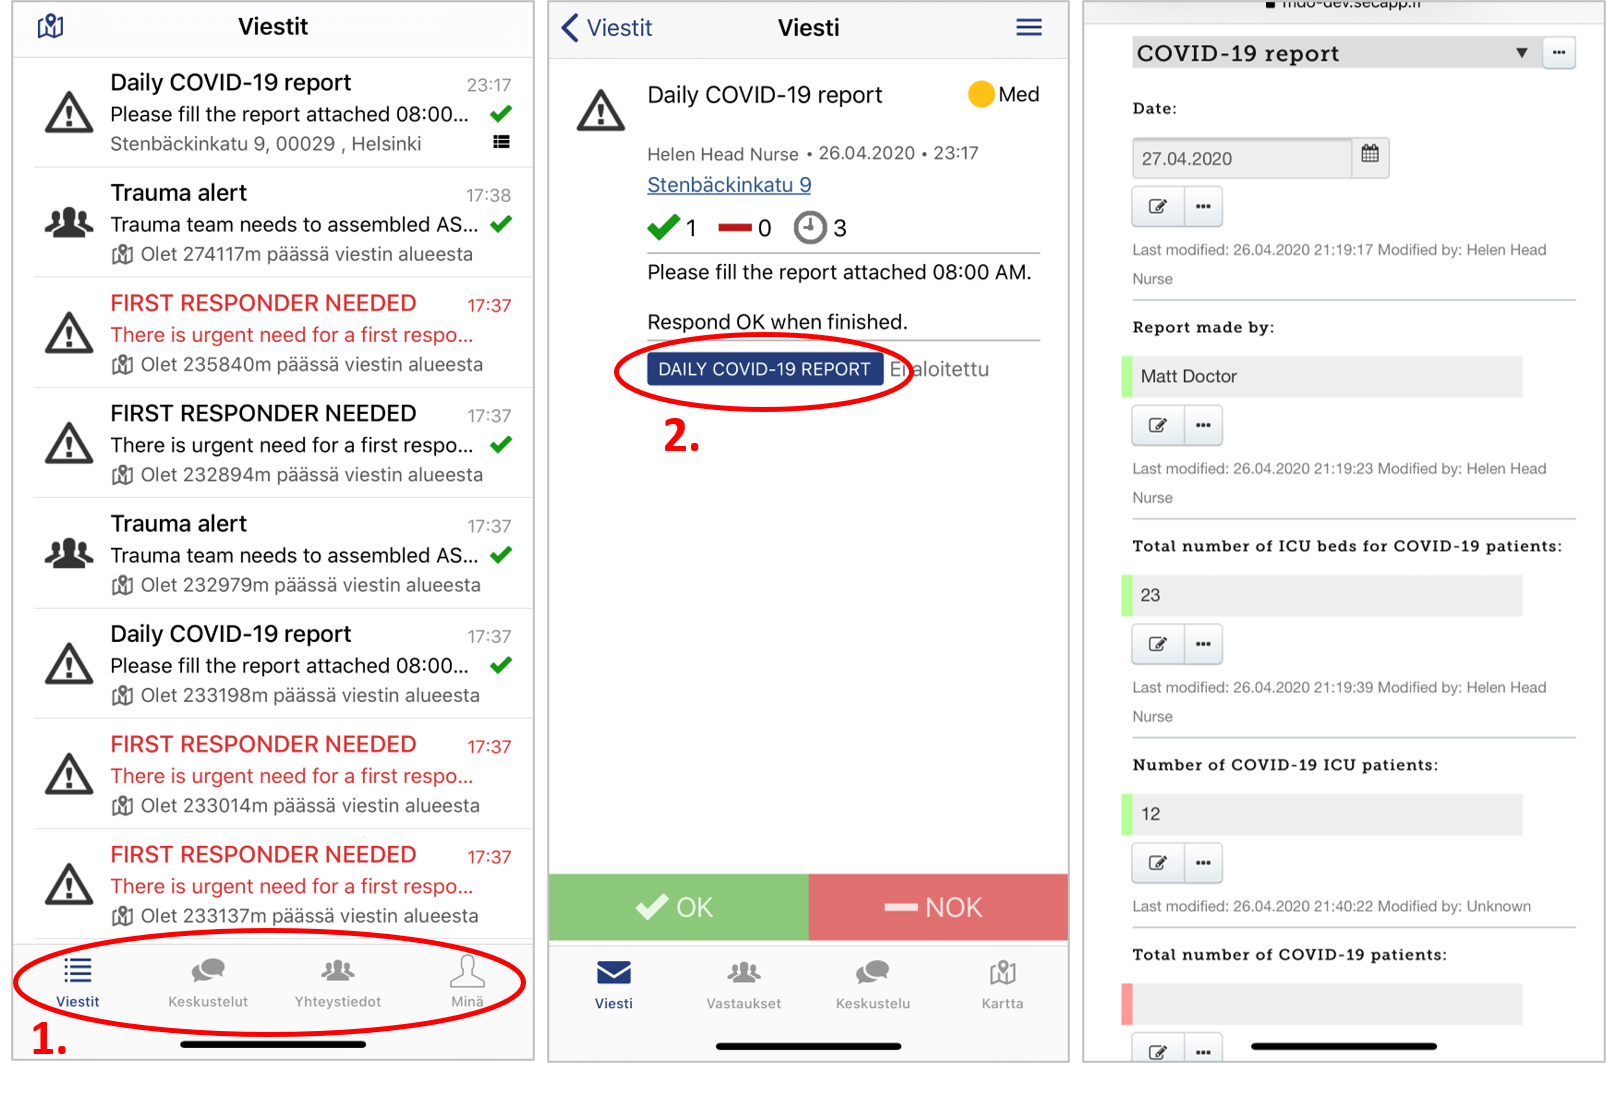
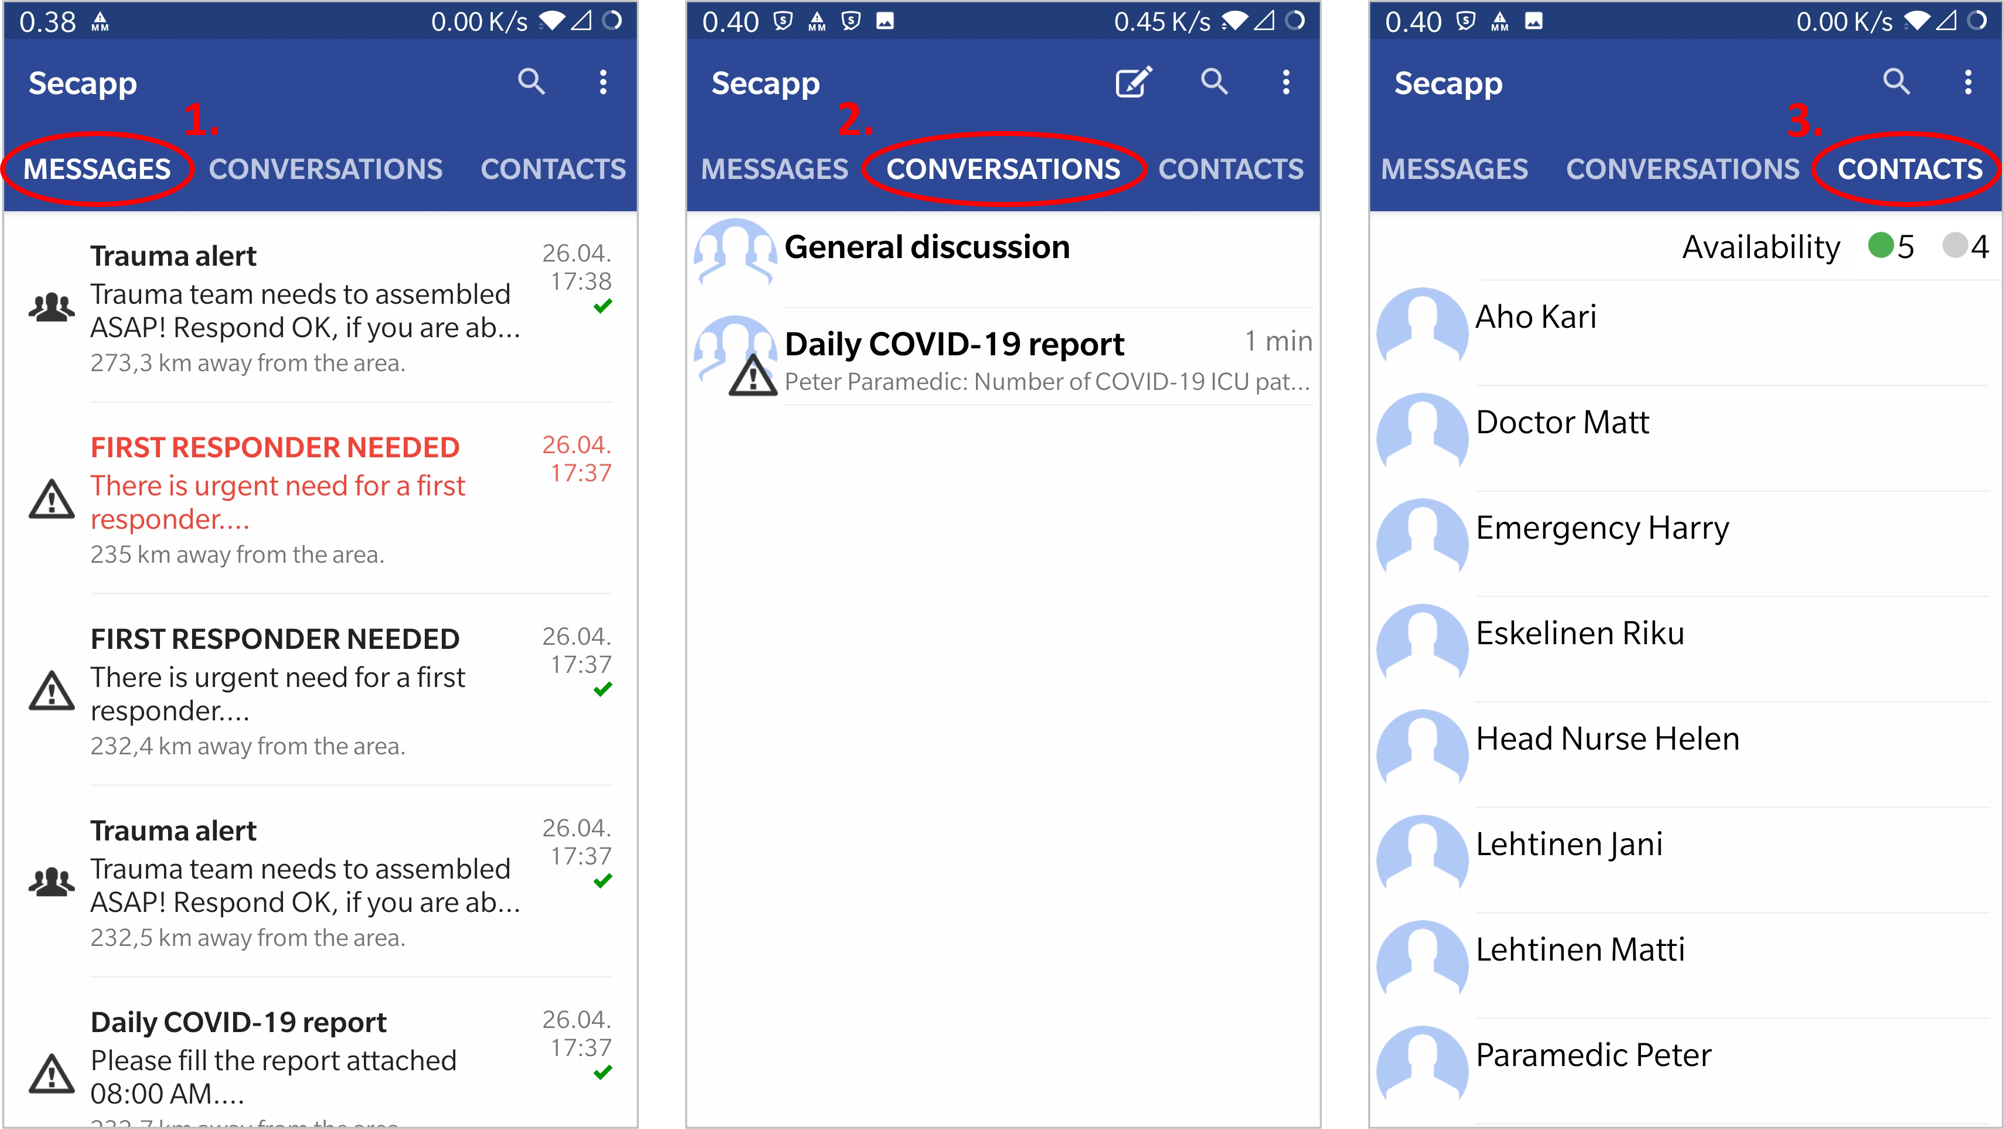
Secapp mobile app has three top-level views:
- Messages lists all alerts the user has sent or received. Red color highlights those alerts the user hasn’t yet responded to.
- Conversations include all chats where the user is involved. Chats can be 1-on-1, group, or alert-specific chats.
- Contacts view shows all contact from the Secapp organization where the user is at the moment. You can start a 1-on-1 chat by pressing user’s name.
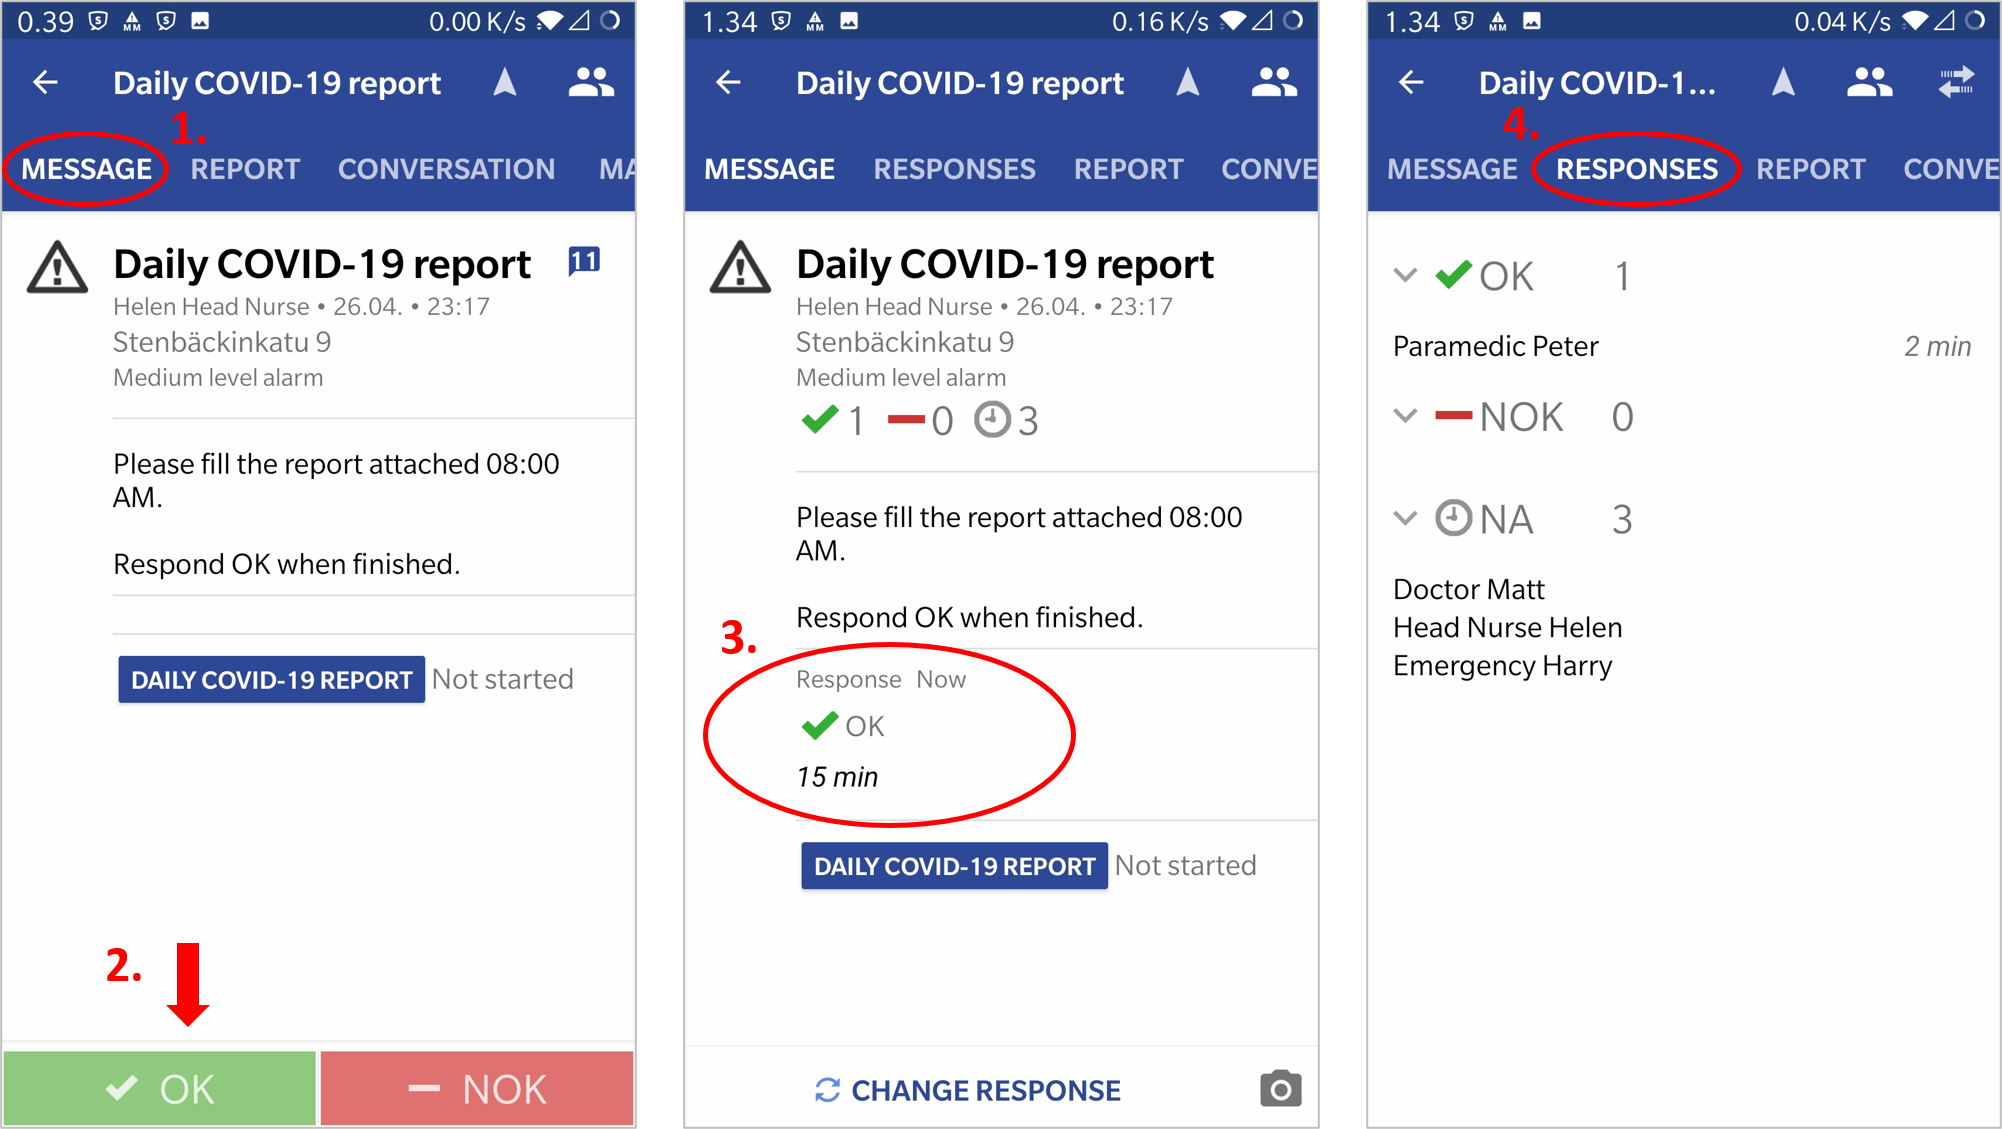
4.1 Receiving an alert with Android app
Alert arrives on the phone with a full-screen alert or with notification. High priority alert bypasses devices mute settings.
- After opening the alert, a message view is shown. Read carefully what the alert concerns and act accordingly.
- You can respond to the alert easily just pressing OK or NOK button from the bottom of the screen.
- After respondin OK/NKO, you can add additional info the the response
- Responses from all users can be seen in the Responses view
You can also receive Secapp alerts by SMS and you can also respond to it sending a sms to the number where the alert came. The format for the SMS response is OK/NOK [space] additional information.
4.2 Filling in the report with Android app
- You can access the report through the alert’s main navigation
- Entering data to the report is very easy: just click the item you like to edit.
- The application recognizes the type of value you wish to edit and opens up the correct input keyboard.
After editing the value, data is automatically synchronized to the server and it can be used in the comprehensive reports available in the browser app.

4.3 Conversations in Android app
- You can access the conversation through the alert’s main navigation.
- Adding text and comments to the chat is just as easy any as instant messaging apps.
- You can also take pictures, share already taken photos and record speech-message.
- Chat supports also sharing files with the users in the chat.

4.4 Mobile app’s main views on the iPhone and in other iOS devices
- iOS app has the same features with that difference iOS navigation is bottom of the screen and the report looks little different than in Android.
- To open the report in iOS app, you should click the blue button below the actual content of the alert message.